Tarahumara
Hill People Gear
$ 160.00
is on back order
A trim little pack with a surprising amount of capability that disappears on your back.
The Tarahumara pack is named after a tribe of natives in northern Mexico, famous for their running prowess. It is a simple stripped down pack designed to carry 2 quarts of water and just enough gear for a light day in the field. However, with its very capable shoulder harness and horizontal compression straps, you've got some overflow capacity if you need it.
Features include:
- 500d Construction
- two generous wand pockets (one on each side) are big enough for USGI pattern 1qt bottles. we like the "Oasis" version made by Nalgene. you can also fit dual 1.5qt round nalgenes on the sides.
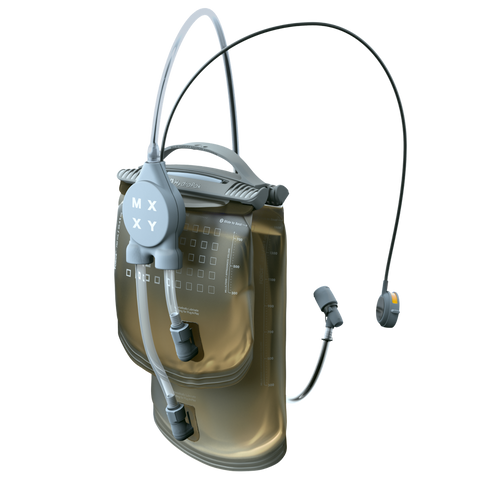
- hang tab for a water bladder on the inside. if you are using a water bladder, the hose routes out the top of the zipper underneath the zipper hood.
- quilted padding on the body side with an exposed flat slot pocket suitable for stashing a netbook, machete, or even a lever action rifle.
- comfortable contoured shoulder harness
- can be used as a back pocket on our larger packs
- parachute and cordlock compression / lashing system on bottom
- dual horizontal compression straps allow you to carry larger items (like snowshoes for example) strapped vertically on the pack. this is the location the 717 stuff sack was designed for.
- accepts: runners harness; small GP and tarainsert
- goes on: Umlindi and Ute
Specifications:
- Weight: 1.44 lbs (653.17 g)
- Length: 4 in (1.57 cm)
- Width: 9 in (3.54 cm)
- Height: 17 in (6.69 cm)
- Comparative Volume: 1000ci / 16L
- Chassis Capacity: 50lbs
| HOW MUCH CAN IT CARRY? |
When you're looking at a pack, one of your very first questions is "how much can it carry?". We want to give you as much information as possible to answer that question, so we give you three different sets of information for each pack - dimensions, volume, and chassis capacity. Each one gives you a different look at what a pack can do. Read below for more detail on each one.
| VOLUME |
Everyone who has taken geometry knows that volume is length * width * height. Except no backpack manufacturer uses that metric. They use a combination of loading a bag with something like beans and voodoo math to arrive at their pack volumes which are expressed in either cubic inches or liters. We used to use simple "dimensional volume" like we learned in geometry for our volumes. Then we started hearing back from unhappy customers that our packs were *way* bigger than we said they were. This is because they had an idea in their head based on other manufacturers' published volumes.
So we started using some voodoo math of our own to come up with "volumes" that allow you to compare apples to apples with other manufacturers. We still hear that our volume measurements are on the conservative side compared to other manufacturers but we're OK with that. At least it's in the same ballpark and you're not going to have the experience of one of our packs being smaller than you thought based on our volume.
In addition to the volume measurement, we also give the dimensional measurements because it's another way to understand just how big a pack is. You can always get out a measuring stick and plot out a rectangle using the dimensions.
| CHASSIS CAPACITY |
Volume is useful, but it doesn't really tell you how load capable a pack is. All of our packs are engineered for load carriage and will safely and comfortably carry much more than their volume suggests. Chassis capacity is how much you can load onto a pack in a pinch and expect it to still be functional. It's a representation of what is possible, not what you should be doing.
Our haulers (the Ute and qui-Ya) have a chassis capacity of 300lbs. We know this because we've done it. However, there are very few people in this world who should be carrying much more than 80lbs in a pack, particularly over broken terrain.
Our smallest pack (the Tarahumara) has a chassis capacity of 50lbs. Does this mean it makes a good overnight pack? Of course not. Other packs in our lineup are far better suited for that role. But, like most of our packs, the Tarahumara has a useful and robust compression system that will let you add a lot of volume to it if necessary.
So if you're out on a hike and find a stash of Spanish gold bullion in some desert canyon, don't hesitate to load that pack up with a few bars to take home. You know you'll never find the stash again so count yourself as fortunate that your pack can carry a lot more weight than you would normally want it to.
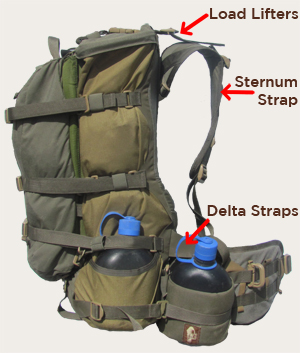
| SHOULDER HARNESS / TORSO HEIGHT |

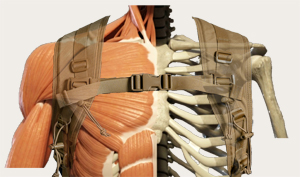
Every Hill People Gear pack uses the same shoulder harness, and needs to be adjusted so the harness rides in the correct position front to back. The HPG shoulder harness is designed to drape the shoulders and spread the load across a wide surface area without impinging on the trapezius or brachial plexus.
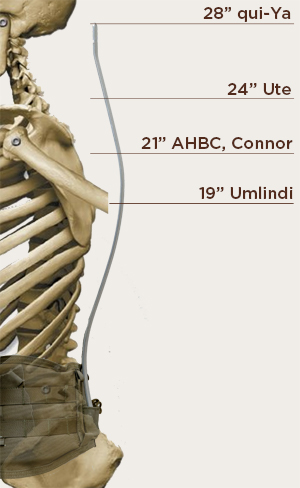
To set the harness, you need to lengthen or shorten the torso height so that the bottom of the pack settles into the lumbar curve and the rear center of the shoulder harness settles in 1-2" below the cervical portion of the spine as depicted in the image above and the video below. This fitment is the same regardless of how tall the pack is or whether it has load lifters. Connor, Aston House, Ute, and qui-Ya packs will all stick up above the harness on the body of an average height person. The critical dimension is between the bottom of the pack and the rear center of the shoulder harness.
If you are using a pack belt, the shoulder harness should be lightly resting on your shoulders. It's there more for stabilizing the pack than bearing any weight. If you can't easily get a couple fingers under the harness on your belted pack you need to lengthen either the torso length, harness front straps, or both.
On the front of the harness, you do not want to overtighten the bottom straps. The harness is meant to drape in such a way that the pack settles into your lumbar. The point of a sternum strap is to take the pressure off of your brachial plexus. As such, the sternum strap should be level with your brachial plexus which is about 2" below your collar bones. Tension the sternum strap just enough to take the pressure off.
| WAIST BELT PLACEMENT |

A proper load bearing waist belt locks the load into your lumbar area and also settles the load around the top of your pelvis. The ultimate goal is to load your long bones (femur on down) instead of your spine. Just like the HPG shoulder harness, the HPG waist belts (Prairie and Recon) are designed to drape the skeleton and distribute load over a wide surface area. In general, the correct height for the waist belt is half above the illiac crest, half below the illiac crest. Once positioned, cinch down as tightly as possible so the load settles evenly around the circumference of your pelvis.
Start the process without anything attached to your belt. Once everything is set up and adjusted properly, add accessories carefully and pay attention to whether they are causing discomfort. There are LOTS of variables involved with different MOLLE pouches and different people's bodies. What is comfortable will also vary from pack to pack and Prairie to Recon Belt.
Note that the Prairie Belt is designed with two sets of removable pads. This is because everyone's body is different. For heavy loads, most people will prefer both pads. However, some people will find the belt more comfortable with just the thick cushy pads or just the thin high density pads.
| STAY ADJUSTMENT |
The purpose of the frame elements (stays, framesheet, closed cell foam) is to direct the pack's center of gravity into the lumbar area. Even without a belt, a properly bent stay will direct some of the load into the lumbar area. With a belt, that same stay will also load the pelvis in addition to the lumbar area.
The stock bend on Hill People Gear stays is meant to work OK for most folks. However, just about everyone will benefit from fitting their stays to their own unique spinal profile. If you purchase from us in our store in downtown Grand Junction, we'll fit it for you. If you've purchased online, you'll need to do it yourself. With the high quality 7000 series aluminum we use, you can do this yourself over your knee or a log along the trail. Once set, it won't flatten out although it will have a springy quality which helps absorb impact. Follow these steps to bend your stays to your back:
- The frame elements (and also the bottom of the pack on the small frameless packs) start at the bottom of the lumbar curve
- With a single stay out of the pack, set it against your back alongside your spine. Bend it to match your lumbar curve.
- Towards the top of your lumbar curve (which will also be a little below your scapula) allow the stay to keep bending outwards away from your lumbar curve
- If you're fitting an Umlindi stay, that's about where it ends.
- For all of the taller stays, bend the top of the stay gently back towards your body once it is an inch or so behind your scapula. You don't want it right on your spine at this point, but you want it to mirror the spine somewhat.
- Note that on the Connor, the bottom part of the frame is comprised of a 19" stay, and the top part is made up of framesheet. So you'll bend a Connor much the same as an Umlindi.
- For the larger 2 stay packs, bend the second stay to match the first stay.
| REMOVING YOUR PACK |
- If your pack has load lifters, reach up and loosen them
- If your pack has delta straps, reach back and loosen them
- If your pack has a waist belt, loosen it
- Unbuckle your sternum strap
- If you are using kit bag lifter straps, unclip them
- Unbuckle your belt
- DO NOT LOOSEN YOUR SHOULDER STRAPS once you've got them properly adjusted, leave them alone
| PUTTING ON YOUR PACK |
- If it is a heavy pack, lift it in front of you and set it on your knee
- Slip into the shoulder harness
- If it is a belted pack:
- buckle the belt
- lean forward at the waist to move the belt up your body
- while leaned forward, tighten your belt as much as possible
- stand upright. the shoulder straps should only be lightly resting on your shoulders, not bearing any load
- Buckle the sternum strap and tighten a touch if need be
- If you are running Kit Bag Load Lifters, clip them in.
- If it is a belted pack, tighten your delta straps. On an Umlindi, this is crucial. Doing so should remove almost all the load from your shoulders
- If your pack has load lifters, snug the load lifters to lift your shoulder harness off your shoulders and turn the top of the pack into a little bit of an s-curved spring
- Walk a ways and then snug everything up as necessary